- Easter may be all about the egg baskets and egg hunts for the kids, but that doesn’t mean the adults don’t get to enjoy a feast of their own.
- Whether you look forward to lasagna, cabbage and onions, shrimp cocktail, or deviled eggs during Easter Sunday brunch, we have an array of balanced recipes that’ll satisfy your cravings and help you stay on track with your health needs.
- If you live with diabetes and any of these Easter foods or recipes are new to you, remember to check your blood sugar before and after eating so there aren’t any surprises.
Easter is a time to come together and celebrate with family and friends. The cold days of winter are finally behind you, spring flowers are beginning to bloom, and there’s no shortage of Easter candy to choose from at the grocery store. But if you or someone you love lives with diabetes, it can be a tricky time to balance the indulgences of Easter with nutritional needs and limitations. Luckily, we have over a dozen recipes to fill out your Easter Sunday brunch spread, including tips on how to enjoy these dishes without setting yourself back on any of your health goals.
Even if you’re familiar with most of these foods and how they affect your health, it’s important to check your blood sugar before and after trying a new recipe if you live with diabetes. That way, you’re less likely to run into any unexpected blood sugar spikes or crashes.
Easter 2023
Sunday, April 9, 2023
Easter means new beginnings, family, friends, and plenty of sweet treats.
It can be hard to stay on track when the grocery aisles are lined with Cadbury eggs and marshmallow Peeps. But with a little preparation and creativity, you can maintain your health goals and enjoy the holiday season.
Diabetes-Friendly Easter Baskets and Egg Hunts
A diabetes diagnosis doesn’t mean your child has to miss out on Easter.
If you’re worried about your child’s blood sugar spiking during Easter parties and egg hunts, pack Easter baskets with a mix of small gifts (think: stickers, small stuffed animals, bubbles, chalk) and a few treats like dark chocolate and sugar-free candy. Just keep in mind that, while sugar-free candy may have less impact on blood sugar, the sugar alcohols that are often used as sweeteners in these treats can sometimes cause digestive distress.
Easter Sunday Brunch
After running around with the little ones during your Easter egg hunt, you’ll probably be craving a hearty brunch—and no Easter Sunday brunch is complete without eggs. A lot of eggs.
First up: deviled eggs.

A classic treat to enjoy after Easter egg-hunting with your family, deviled eggs are a great low-carb source of protein, so you won’t have to worry about any surprise blood sugar spikes.
For an extra kick in your yolk filling, try using cracked black pepper instead of regular, or add an extra ½ teaspoon of yellow or dijon mustard.
If you like your deviled eggs more savory, use only one teaspoon of sweet relish or forgo it completely (which, by the way, would also reduce the recipe’s carb content to about 1 gram per serving instead of 3 grams).
Easy Deviled Eggs
Serves 6
Serving size: 2 halves
Prep time: 30 minutes
Cook time: 20 minutes
Estimated Nutrition Facts (per serving)
Carbs: 3g
Fiber: 0g
Fat: 8g
Saturated Fat: 2g
Protein: 6g
Sodium: 220mg
Ingredients
- 6 hard boiled, medium eggs
- ½ tsp white vinegar
- 2 tsp sweet pickle relish
- 1 tsp dijon mustard
- ½ tsp paprika
- Black pepper, to taste
- ⅛ tsp of salt
- ½ raw white onion, chopped
- 2 ½ tbsp mayonnaise
Directions
- Boil the eggs for 20 minutes. Then, remove from heat, rinse with cold water, and peel.
- Cut eggs in half and gently remove the yolks. Set aside the egg whites on a plate and place yolks in a medium glass bowl.
- Add vinegar, relish, mustard, black pepper, salt, onions, and mayo to the bowl filled with yolks. Stir while breaking yolks apart with a spoon until they reach a creamy and even consistency.
- Evenly spoon yolk mixture into egg whites until all mixture is used.
- Sprinkle paprika and black pepper on top.
- Refrigerate for at least 30 minutes before eating. Serve cold.
For an egg dish that’s still relatively simple, but a bit more filling, look no further than our stovetop frittata.

The beauty of a frittata is that you can use just about any type of veggies and cheese you have in your fridge for the filling, and it’s bound to be delicious. Our recipe calls for green bell pepper, scallions, fresh spinach, and mozzarella, but you can also mix it up with arugula and Swiss cheese, broccoli and cheddar, or mushrooms and gruyere.
If you need to make the recipe dairy-free, leave out the cheese and milk, or choose vegan cheese and plant-based milk instead.
However you choose to prepare this dish, you can keep it in the fridge for up to three days—perfect for planning ahead for your Easter celebration.
Simple Stovetop Frittata
Serves 4
Serving size: ¼ pan, about 3” slice
Prep time: 10 minutes
Cook time: 15 minutes
Estimated Nutrition Facts (per serving)
Carbs: 5g
Fiber: 1g
Fat: 14g
Saturated Fat: 5g
Protein: 17g
Sodium: 290mg
Ingredients
- 8 eggs
- 1 green bell pepper, chopped
- 1 cup fresh spinach, roughly chopped
- 2 tbsp of 1% milk
- 2 tsp extra virgin olive oil
- ¾ cup fresh mozzarella
- 2 tsp garlic or onion powder
- ¼ cup scallions, divided
- ¼ tsp black pepper
Directions
- Wash, dry, and chop peppers, spinach, and scallions (separate white sections from green).
- In a medium bowl, whisk together eggs, milk, and garlic powder.
- Bring a 8-10” cast iron skillet to medium heat and add oil. When the pan reaches a medium heat (about 300 degrees Fahrenheit), add prepared peppers, spinach, and white sections of the scallion.
- Saute for one to two minutes. Then add egg mixture. Swirl around to combine. Sprinkle torn pieces of fresh mozzarella.
- Cover and cook for 10-15 minutes. Check at around 10 minutes to gauge if it’s ready. The eggs have finished cooking when they are firm to touch.
- Garnish with green scallion tops and black pepper.
- Slice into quarters and serve.
Need a vegan option in your Easter Sunday brunch spread? No problem. Our mini tofu veggie frittatas are a guaranteed crowd-pleaser.

Tofu not only takes on the flavor of whatever seasonings you include, but its texture is also similar enough to eggs to use as a vegan substitute.
Our recipe blends tofu with unsweetened pea protein milk (or another unsweetened plant milk of your choice), ground flaxseed (a solid source of fiber and protein), and, for seasoning, black pepper, turmeric powder, and an optional sprinkle of nutritional yeast—a supplement of dried yeast that offers a savory, rich flavor (similar to a broth or cooked meat) that’s also comparable to the taste of cheese.
While the tofu mixture is combined with a veggie-based mixture of onions, garlic, broccoli, carrots, and arugula, you might find yourself wanting a little more out of this dish. In that case, try serving with a small bowl of Greek yogurt, berries, and almonds on the side to make it more filling.
Mini Tofu Veggie Frittata
Serves 4
Serving size: 3 frittatas
Prep time: 10 minutes
Cook time: 30 minutes
Estimated Nutrition Facts (per serving)
Carbs: 20g
Fiber: 6g
Fat: 14g
Saturated Fat: 1.5g
Protein: 16g
Sodium: 370mg
Ingredients
- 1 package extra firm tofu
- 1 small sweet onion or medium shallot, diced
- 2 tbsp minced garlic
- 2 cups broccoli
- 1 cup shredded carrots
- ½ cup arugula
- ½ tsp turmeric powder
- ½ tsp salt
- 1 tsp black pepper
- ½ cup unsweetened pea protein milk (or other unsweetened plant milk)
- 1 tbsp ground flaxseed
- 2 tbsp extra virgin olive oil, divided
- 2 tbsp nutritional yeast (optional)
Directions
- Preheat the oven to 350 degrees Fahrenheit. Open the tofu, drain the liquid, and wrap it in a clean kitchen towel or paper towel. Chop the broccoli into small pieces, dice the onion or shallot, and mince the garlic.
- Mix vegetables together in a bowl with 1 tbsp olive oil. Set aside.
- Place a medium-sized sautée pan over medium heat. Add remaining 1 tbsp of oil, onion, and garlic. Sautée for 2 minutes. Then, add broccoli and carrots and cook for an extra 3 minutes until tender. Add arugula and allow it to wilt. Set mixture aside to cool.
- In a blender, add tofu, pea milk, ground flax, and seasonings. Blend until smooth.
- Prepare a 12 compartment muffin tin with cooking spray. Spoon one tbsp of tofu mixture into each muffin cup. Add two tablespoons of the vegetable mixture and press down into the tofu. Top with another tbsp of the mixture. Tap the muffin tin on the counter to ensure there are no gaps or bubbles.
- Bake for 25-30 minutes or until firm in the center. Allow to cool slightly before serving.
Meat and Fish
Easter Sunday brunch is all about the meat and fish—from ham and beef roasts to lasagna and seafood spreads.
If you’re managing diabetes, you might be hesitant to dig into these carb-heavy dishes. In that case, come prepared for your Easter celebration with a few options that are a little more balanced, yet still yummy—such as our zucchini lasagna.

A plant-friendly take on an Easter favorite, our zucchini lasagna features a mix of yellow and green squash and lean ground beef, plus a combo of part-skim mozzarella, ricotta, and pecorino romano cheese.
One Drop coaches recommend looking for grass-fed beef in the grocery store, as it tends to be higher in heart-healthy omega-3 fats. However, it also might be more difficult to find and a bit more expensive, so try scouring your local store to see if there are any sales.
To make this dish vegetarian, use meat-substitute crumbles or beans instead of beef. Beef can also be easily swapped for ground chicken or turkey if that’s your preference.
While our recipe calls for a homemade tomato sauce, you can use a jarred sauce instead if you’re short on time. Just remember that jarred sauces may have added sugar and more salt, so be sure to check the nutrition label closely.
Zucchini Lasagna
Serves 6
Serving size: 2 ¼ x 3 ¼” square
Prep time: 20 minutes
Cook time: 30 minutes
Ingredients
- 2 medium green zucchini (squash), cut lengthwise
- 2 medium yellow zucchini (squash), cut lengthwise
- 1 tbsp extra virgin olive oil
- 1 lb 93% lean ground beef
- 1 cup shredded part skim mozzarella cheese
- 4 cloves garlic, peeled and minced
- 1 28-oz can no-salt added crushed tomatoes
- 1 egg
- 1 cup part skim ricotta cheese
- ¼ cup pecorino romano cheese, grated
- ½ tsp dried oregano
- 1 tsp crushed red pepper flakes
- ½ tsp black pepper, optional
- ¼ cup fresh parsley, chopped
- 6 fresh basil leaves, torn (or 2 tsp dried)
Directions
- Preheat the oven to 400 degrees Fahrenheit. Wash and prepare the squash. Slice lengthwise to create long flat “sheets.” Peel and mince the garlic cloves.
- Add olive oil to a medium-sized pan over medium-high heat. Once hot, add the beef, and brown the meat until it’s no longer pink. Drain most of the fat and water from the ground beef. Leave a small amount to brown the garlic. Set beef aside.
- Add garlic and cook until just lightly browned. Add half the crushed tomatoes, bring to a boil, and reduce heat to low. Allow the canned tomatoes to cook for 5 minutes. Then, add the remaining half of the can, bring to a boil, and reduce heat to low. Simmer for an additional 5 minutes.
- Add salt, crushed red pepper, and oregano to the sauce. Allow the flavors to combine for a few minutes and turn off heat.
- In a mixing bowl, combine and mix ricotta, parmesan, parsley, black pepper, and egg.
- Add ½ cup of the sauce to a 9x13” baking dish and spread evenly. Create a layer of the sliced zucchini on top of the sauce. It’s okay if they overlap.
- Add the beef to the remaining sauce and mix well. Gently spread half of the ricotta mixture over the squash, top with half the sauce and meat, and repeat for a second layer. Sprinkle the parmesan cheese over the dish to coat the sauce and end with a final sheet of zucchini. Top with shredded mozzarella and half of the basil leaves.
- Bake at 400 degrees Fahrenheit for 25-30 minutes. Garnish with remaining basil leaves and serve.
For a light seafood dish, our mahi-mahi with mango avocado salsa is equal parts refreshing and satiating.

Made with avocado, jalapeño, cilantro, lime juice, grape tomatoes, mango, and red onion, the salsa is the true star of this recipe, pairing perfectly with the mild taste of mahi-mahi.
Based on your preferences and what you can find at the store, feel free to get creative with your choice of fish. Our recipe may use mahi-mahi filets, but cod, halibut, and salmon can all work well (just remember the cooking time may vary depending on the type, size, and thickness of the fish).
Another tip: Fresh fish typically has firm skin and no fishy smell. If you’re purchasing the fish whole, be sure to choose one with bright clear eyes and scales that are intact.
Mahi-Mahi with Mango Avocado Salsa
Serves 3
Serving size: 1 filet
Prep time: 30 minutes
Cook time: 20 minutes
Estimated Nutrition Facts (per serving)
Carbs: 17g
Fiber: 5g
Fat: 9g
Saturated Fat: 0g
Protein: 30g
Sodium: 380mg
Ingredients
- 1 lb mahi mahi filets (may substitute with cod or halibut)
- ½ tsp oil
- ⅛ tsp salt
- ¼ tsp ground pepper, or to taste
- 1 small avocado, chopped (~1 cup)
- 1 jalapeño, deseeded and diced
- ⅓ cup fresh cilantro, chopped
- 1-2 limes, juiced
- ⅛ tsp salt + ground pepper, to taste
- 1 cup grape tomatoes, quartered
- 1 cup mango, diced
- ¼ cup red onion, diced
- Crushed red chili flakes or a dash of your favorite hot sauce, optional
Directions
- Wash and chop the produce for salsa. Combine the chopped tomato, mango, onion, avocado, jalapeño, cilantro, lime, salt, and pepper in a bowl and set aside. Toss before serving.
- Preheat the oven to 400 degrees Fahrenheit. Pat the fish dry and divide it into 3 servings (about 5 to 5 ½ ounces each, which will shrink after cooking). Line a baking sheet with parchment paper.
- Lightly brush the fish with oil, and season with salt and pepper. Cook fish in the air fryer, toaster oven, or regular oven at 425 degrees Fahrenheit for 15-20 minutes. Fish should be cooked to an internal temperature of 140-145 degrees Fahrenheit.
- Plate the fish, top with mango avocado salsa, and serve immediately.
Next on your Easter seafood menu: a classic shrimp cocktail.

Shrimp is not only low in carbs, high in protein, and rich in omega-3s, but you also can’t deny that a shrimp cocktail display is simply beautiful to look at (not to mention delicious).
The cocktail sauce, of course, is what really makes party-goers come back for more. Sure, you could pick up a cocktail sauce at the store, but by making your own at home, you’re saving on both sodium and added sugar. Our cocktail sauce features a combination of ketchup, horseradish, lemon juice, black pepper, Worcestershire sauce, water, and an optional teaspoon of Tabasco sauce if you like a little extra heat. To cut down on even more sugar, try ketchup brands like organic Heinz, True Made Foods, Annie’s Unsweetened, and Red Duck.
If you want to play with the consistency of your cocktail sauce, add an additional teaspoon of water to make it thinner, or leave out the water entirely for a thicker sauce.
As for your shrimp, they can be fresh or frozen. If frozen, thaw them immediately prior to serving. If fresh, saute the shrimp until they’re white and firm to the touch. Enjoy!
Easy Shrimp and Cocktail Sauce
Serves 6
Serving size: 3 shrimp + 1 tbsp sauce
Prep time: 15 minutes
Estimated Nutrition Facts (per serving)
Carbs: 4g
Fiber: 0g
Fat: 0g
Saturated Fat: 0g
Protein: 14g
Sodium: 200mg
Ingredients
- 12 oz (about 18 large) shrimp, cleaned and pre-cooked
- ¼ cup ketchup
- 1 tbsp horseradish
- 1 lemon, juiced
- ½ tsp ground black pepper
- 2 tsp Worcestershire sauce
- 1 tsp water
- 1 tsp Tabasco sauce, optional
- 1 sprig parsley and 4 large lettuce leaves (optional, for garnish)
Directions
- If the shrimp are frozen, run under water for 3 minutes or until thawed.
- In a small serving bowl, whisk together all of the remaining ingredients.
- Lay optional lettuce leaves on a serving platter and place shrimp on top. Put sauce in the center and garnish with an optional parsley sprig.
Veggies
Easter may be a day of indulgence, but that doesn’t mean there isn’t room for a few greens on the table—like this citrus fennel salad.

Fennel isn’t for everyone, but for those who love its bold, licorice-like flavor, it pairs beautifully with the sweetness of the blood oranges in this salad. We also toss in some crunchy radicchio, heart-healthy avocado, protein-packed slivered almonds, fresh mint leaves, and gorgonzola cheese to balance out the flavors.
Not a fan of orange slices? Substitute it with grapefruit—but, before you do, check with your doctor or pharmacist about the fruit’s possible interactions with medications for blood pressure, irregular heartbeat, cholesterol, allergies, or anxiety.
If you’re keeping blood oranges in the mix but you’re worried about carbs, you can bring down the carb content by 15 grams per recipe by using just one orange instead of two.
Either way, this zesty salad is sure to satisfy your taste buds.
Citrus Fennel Salad
Serves 4
Serving size: 1 ½ cups
Prep time: 10 minutes
Estimated Nutrition Facts (per serving)
Carbs: 23g
Fiber: 8g
Fat: 17g
Saturated Fat: 3.5g
Protein: 6g
Sodium: 150g
Salad Ingredients
- 1 fennel bulb, thinly sliced
- 2 cups radicchio leaves, torn
- 2 blood oranges, segmented
- 1 avocado, diced
- 1 tbsp slivered almonds
- ¼ cup fresh mint leaves, chopped
- ¼ cup gorgonzola cheese
Dressing Ingredients
- 2 tbsp extra virgin olive oil
- 1 lemon, juiced
- 2 garlic cloves
- 1 tsp dijon mustard
Directions
- Wash and prepare ingredients.
- In a small bowl, whisk together olive oil, lemon juice, garlic, and mustard.
- In a larger salad bowl, toss fennel radicchio with the dressing.
- Layer the oranges onto the salad.
- Top with avocado, almonds, cheese, and mint.
Need more greens to choose from? Our zingy grape chicken salad is sure to be a crowd favorite.

Featuring shredded chicken, grapes, pecans, red onion, celery, and kale, this salad is rich in heart-healthy nutrients and packed with flavor. The dressing combines dijon mustard with nonfat plain Greek yogurt and lemon juice for a tasty, yet relatively low-fat topping to your greens.
Concerned about carbs? Cut the number of grapes used in this recipe (½ cup) by half to dial it down.
Another suggestion: While fresh chicken is lower in sodium, you could save time by using canned or precooked chicken. But you can also keep sodium low in this recipe by omitting additional salt and checking your mustard labels. Aim for sodium levels below 100mg per serving to stay under 500mg for the entire meal.
Once you’re done preparing this salad, enjoy it as is, or spread the mixture on sandwiches, lettuce wraps, or even apple slices if you want to get creative.
Zingy Grape Chicken Salad
Serves 6
Serving size: ~2 cups
Prep time: 15 minutes
Estimated Nutrition Facts (per serving)
Carbs: 15g
Fiber: 5g
Fat: 16g
Saturated Fat: 1.5g
Protein: 21g
Sodium: 450mg
Salad Ingredients
- 2 cups boneless, skinless chicken breast, cooked and shredded
- ½ cup grapes, halved
- ⅔ cup pecans (toasting optional)
- 1 medium red onion, diced
- 3 celery stalks, chopped
- 6 cups kale, chopped
- Dressing Ingredients
- ¼ cup + 2 tbsp Dijon mustard
- ½ cup nonfat plain Greek yogurt
- 2 tbsp lemon juice
- 1 tsp black pepper
- 2 tsp garlic powder
- ¼ tsp ground sage, optional
Directions
- In a medium bowl, whisk together yogurt, mustard, lemon juice, and spices. Set aside.
- Toast pecans, if desired. Wash and chop the onion and celery. Wash and dry kale. Add chicken, onion, celery, and grapes to the bowl with the dressing and mix well.
- Serve the chicken salad over a bed of mixed greens or baby kale and top with pecans.
For a more flavorful veggie-based side dish, try our southern cabbage with caramelized onions.

Thanks to its low starch content, cabbage is a great veggie to enjoy when you live with diabetes—and, to be frank, it tastes delicious with caramelized onions.
Cabbage and onions are often served with bacon, but if you want a lower-sodium option, try using turkey bacon instead, which has less salt.
To further reduce salt, make your own Cajun seasoning for this dish by blending garlic powder, onion powder, paprika, black pepper, cayenne pepper, dried thyme, and dried oregano.
We recommend serving as a side with lean protein such as grilled chicken, marinated tofu, stewed beans, or even turkey breast—but we won’t judge if you just eat it straight.
Southern Cabbage with Caramelized Onions
Serves 8
Serving size: ½ cup
Prep time: 10 minutes
Cook time: 15 minutes
Estimated Nutrition Facts (per serving)
Carbs: 14g
Fiber: 4g
Fat: 2g
Saturated Fat: 0g
Protein: 2g
Sodium: 270mg
Ingredients
- 1 large head of green cabbage
- 1 large sweet onion
- 2 cloves garlic
- 1 tbsp canola oil (or other neutral flavored oil)
- ½ tsp smoked paprika
- 1 tsp onion powder
- 1 tsp garlic powder
- ¼ tsp cayenne pepper
- ½ tsp cajun seasoning
Directions
- Heat a large and deep skillet over medium-high heat.
- Dice the onion, mince the garlic, and chop the cabbage into 1-inch pieces, excluding the core.
- Add the oil to the skillet to heat. Then, add onion. Allow the onions to cook until caramelized, or about 4 minutes. Stir occasionally.
- Add the chopped cabbage, minced garlic, and seasonings. Stir well and saute for an additional 10 minutes or until cabbage is tender.
Dessert
Cadbury eggs and marshmallow Peeps aren’t the only sweets worth enjoying on Easter. If you need a break from all the sugar-heavy treats at your Easter party, we have a few options that will help you keep your blood sugar levels on track and satisfy your sweet tooth.
First up: chocolate peanut butter date bites.

Dates have a low glycemic index, meaning they’re less likely to spike your blood sugar levels, making them a great fruit to snack on.
Perhaps you’ve heard of stuffed dates or chocolate-covered dates, but our recipe combines both of those elements into one tasty treat. Each date is filled with peanut butter then dipped in a melted mixture of stevia-sweetened dark chocolate chips and coconut oil. After freezing the coated dates for about 30 minutes, they’re ready to go.
Our heart-healthy recipe recommends crunchy peanut butter without added fat or sugar, but you can also use smooth peanut butter and increase the crushed peanuts to ¼ cup, adding some to the center of the date before dipping in the chocolate.
Coconut oil is optional in the chocolate mixture, but it does help to keep the chocolate coating solid. Another way to keep the chocolate shell hard is to keep the date bites frozen between snacking—that is, if you can resist.
Chocolate Peanut Butter Dates
Serves 10
Serving size: 1 date
Prep time: 5 minutes
Freeze time: 30 minutes
Estimated Nutrition Facts (per serving)
Carbs: 25g
Fiber: 6g
Fat: 6g
Saturated Fat: 2.5g
Protein: 2g
Sodium: 5mg
Ingredients
- 10 medjool dates, pitted
- 2 tbsp crunchy peanut butter
- 2 tbsp roasted peanuts, crushed
- ½ cup stevia-sweetened dark chocolate chips
- 1 tsp coconut oil (optional)
Directions
- Line a baking tray with parchment paper.
- Cut a slit in the dates lengthwise and remove the pit.
- Fill each date with the peanut butter and press to close.
- In a small microwave safe bowl, add the chocolate chips and coconut oil. Place in the microwave and heat in 15-second increments until melted. Stir well until smooth.
- Using two forks, dip the stuffed date into the chocolate, ensuring that it is entirely coated. Allow excess chocolate to drip back into the bowl. Place the coated dates onto the prepared baking sheet and sprinkle with crushed peanuts.
- Once all the dates have been prepared, place the baking sheet into the freezer for at least 30 minutes.
If you’re in the mood for something a bit more decadent, these fudgy black bean brownies are a delightful option.
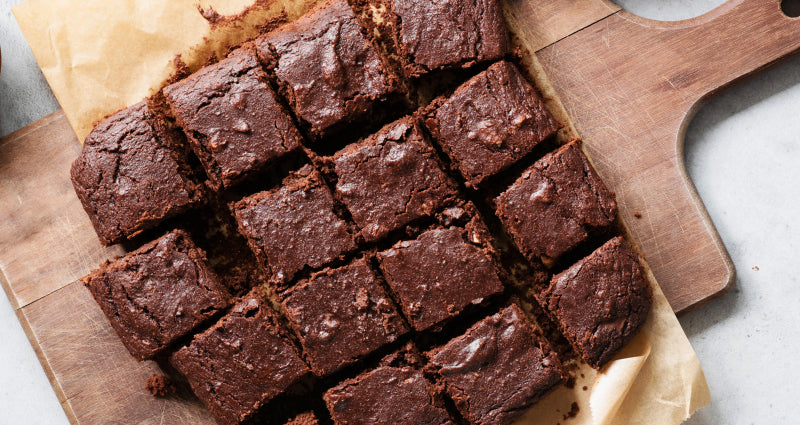
Not convinced by the idea of black beans in your dessert? Get this: Black beans not only add more protein and fiber (meaning you’ll feel more satiated after your snack), but their starchy quality will make you forget there’s no flour in this recipe. In fact, you’ll probably notice a fudgier texture, sweetened by cocoa powder, sugar, and semi-sweet chocolate chips (plus ground coffee, which deepens the flavor of your chocolate ingredients).
To cut down the sugar content, switch to granulated monk fruit sweetener or stevia-sweetened chocolate chips.
While our recipe calls for fiber-rich ground flax to hold the ingredients together, you can also use two eggs as a binder instead.
Fudgy Black Bean Brownies
Serves 9
Serving size: 1- 3x3-inch square
Prep time: 10 minutes
Cook time: 35 minutes
Estimated Nutrition Facts (per serving)
Carbs: 43g
Fiber: 6g
Fat: 8g
Saturated Fat: 4.5g
Protein: 5g
Sodium: 75mg
Ingredients
- 1 14-oz can no-salt black beans, drained and rinsed
- 2 tbsp ground flax
- 1 tbsp unsweetened almond milk
- ½ cup cocoa powder
- ½ teaspoon canola oil (or vegetable oil)
- 1 tsp apple cider vinegar
- ½ tsp baking powder
- ½ tsp baking soda
- 1 tsp instant coffee (or freshly ground coffee)
- 1 cup semi-sweetened chocolate chips, divided
Directions
- Preheat the oven to 350 degrees Fahrenheit. Grease a 9x9 baking dish with spray and line with parchment paper. Leave a 2-inch overhang of parchment paper on all sides.
- In a small bowl, mix together the ground flax and 6 tbsp water. Set aside.
- Add the black beans, cocoa powder, sugar, oil, almond milk, vinegar, baking soda, baking powder, and coffee into a blender or food processor. Pulse until combined. Add the flax and water mixture. Then, blend until smooth.
- Pour into a medium mixing bowl and fold in ½ cup of chocolate chips. Pour the prepared batter into the pan. Sprinkle the remaining chocolate chips evenly over the top of the batter.
- Bake the brownies for 32-35 minutes or until an inserted toothpick comes out clean. Allow the brownies to cool completely before slicing into 3x3-inch squares.
Craving something lighter that’ll go great with your coffee the next morning? Enter: zucchini walnut muffins.

If you have leftover zucchini from your lasagna, what better way to make use of it than with a batch of muffins?
The idea of zucchini in muffins might hit the same nerve as the concept of black beans in brownies, but it’s not as far-fetched as you may think. Thanks to their water content, zucchinis can give muffins that much-needed, deliciously moist texture we all know and love.
The only possible caveat: soggy muffins. To avoid this, allow the zucchini to strain after shredding it, using a fine mesh sieve if needed to get the water out.
Our recipe calls for quite a few spices—including anti-inflammatory cinnamon, ginger, and nutmeg—but if you only have pumpkin spice seasoning in your pantry, you can use that as an alternative. Who says pumpkin spice is only for the fall?
Zucchini Walnut Muffins
Serves 12
Serving size: 1 muffin
Prep time: 15 minutes
Cook time: 25 minutes
Estimated Nutrition Facts (per serving)
Carbs: 32g
Fiber; 5g
Fat: 27g
Saturated Fat: 4g
Protein: 12g
Sodium: 190mg
Ingredients
- 1 large zucchini, shredded
- 1 ¾ cup whole wheat flour
- ¼ cup ground flax
- 1 tsp baking powder
- ¼ tsp salt
- 2 tsp ground cinnamon
- 1 tsp ground ginger
- ½ tsp nutmeg
- ⅓ cup brown sugar
- ⅓ cup granulated monk fruit sweetener
- 1 ½ cup chopped walnuts
- 2 tsp vanilla extract
- ⅓ cup vegetable oil
- 2 eggs, room temperature
- ½ cup plain nonfat Greek yogurt
- ¼ cup flax milk (or milk of choice)
- ¾ cup smooth peanut butter
Directions
- Preheat the oven to 350 degrees Fahrenheit.
- Place shredded zucchini in a clean kitchen towel or paper towels. Squeeze out excess liquid. This is an important step to avoid soggy muffins.
- In a large bowl, mix together the brown sugar, monk fruit, vanilla extract, vegetable oil, yogurt, eggs, and milk. Add zucchini to wet ingredients. Stir until combined.
- In a separate medium-sized bowl, mix together the flour, baking powder, salt, cinnamon, ginger, ground flax, and nutmeg.
- Gently combine the dry ingredients into the wet, being careful not to overmix. Fold in the chopped walnuts.
- Prepare the muffin tin with spray oil or cupcake liners. Spoon the batter into the muffin tin evenly.
- Bake on the middle rack at 350 degrees Fahrenheit until golden brown, about 20-30 minutes. Test with a toothpick to ensure it comes out clean. Top each with ~tbsp of peanut butter and enjoy.
Finally, for a fruity, refreshing treat that’ll make you think of summer, try whipping up our strawberry sorbet.

Featuring just a handful of ingredients—frozen strawberries, orange juice, water, and an optional squeeze of lemon juice—this dessert is a perfect last-minute addition to your dessert spread if it turns out to be a hot afternoon.
If strawberries and orange juice aren’t your favorites, go with the fruit flavors you and your loved ones enjoy most. Any fruit juice can be used in place of orange juice, and in lieu of strawberries, you can use honeydew, blueberry, or even mango. You can also use more water for a less sweet sorbet, or dial up the sweetness by skipping the fruit juice and using three to four tablespoons of agave nectar, maple syrup, or another liquid sweetener of your choice instead. No matter what you choose, it’s sure to hit the spot.
Strawberry Sorbet
Serves 2
Serving size: ½ cup
Cook time: 10 minutes
Estimated Nutrition Facts (per serving)
Carbs: 8g
Fiber: 2g
Fat: 0g
Saturated Fat: 0g
Protein: 1g
Sodium: 0mg
Ingredients
- 8 oz strawberries, frozen
- 2 tbsp 100% orange juice
- 1-2 tbsp water
- Squeeze of lemon juice, optional
Directions
- In a food processor or blender, pulse the strawberries into small pieces. Pulse in short bursts to ensure the sorbet doesn’t melt from the heat of the blades.
- While still pulsing, add the orange juice one tablespoon at a time. The consistency will start to resemble a sorbet. Add more liquid if needed.
- Squeeze lemon juice into the blender, if desired. Blend to mix, for no more than a couple of seconds. Serve immediately and enjoy.